|
|
How to Make Greetings CardsHow to make greetings cards? To make some exclusive greetings cards you only need some simple materials. As an artist you are really creating some smaller versions of your normal paintings. For example - be it for large framed paintings or exclusive greeting cards I work on Saunders Waterford 300lbs, rough water colour paper.
Materials Needed to Make Greetings CardsTo make greetings cards gather together:
Design ChoiceTo make greetings cards you need to decide on the overall look of your cards. Now is the point when you start to consider the images you want on your cards. It is crucial to bear in mind the size. Personally I do not think it is wise to choose something that,s too details. Also you may wish to use familiar source material -that is to say sketches or photos you have done successful paintings from. Remember these cards are all one offs: you do not want to spend several hours on a small painting for only one card. ( you are not creating a unique card that you will then get copies created from ).
Creating the PaintingThere are a number of ways to create a painting for your cards.
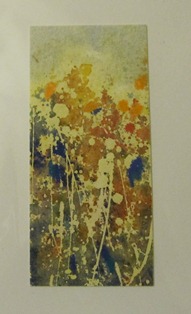
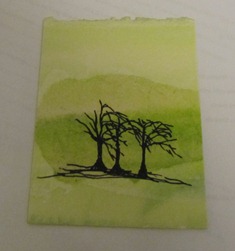
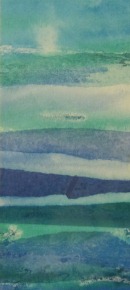
1. Cut some watercolour paper to size and paints some beautiful, small landscapes.
2. Revamp some of your old paintings that you are not happy with. By cutting them up and preserving the best parts you can often discover hidden gems in a discarded painting. You can relook at your 'gems' and add more colour or texture.
3. Work on a long strip of watercolour paper. Remember you will cut this up to make the feature for a number of cards.
STEP by STEP GUIDE TO CARD MAKING1. Get card the size you require and fold if it's not already scored. Decide on size of landscape image you wish to paint.
2. Create your landscape painting. Remember, if you are going to use pastels you need to fix them so they do not smudge. 3. Leave your paintings to dry. If you're doing a variety of layers such as in mixed media work, to create your picture, allow them to drive between stages. You can use a hair dryer to speed up the process. 4. Using PVA glue and an old brush, your small paintings onto a piece of your card. Be very careful not to get glue in the wrong places. I find it best to put the glue onto the back of the painting with a paintbrush. By doing this you can make sure you don't get glue too close to the edges. Carefully press your image down onto the card. 5. Have an old magazine at hand, open it and place the card, with the image stuck to it on an open page. Turn over the page of the magazine, so that the card is protected and once you have stuck your next image to a card place that in also. Continue doing this until all your cards are inserted in the magazine, close any remaining pages and weigh it down with a pile of books or something else suitable. 6. Once the cards had been weighted down for a couple of days take the books off and carefully remove your greetings cards. You need to have some prepared sticky labels, preferably designed and printed from your computer with your name and any further details you want, ready to stick on to the back of your cards. This is another way you can advertise your website ect.
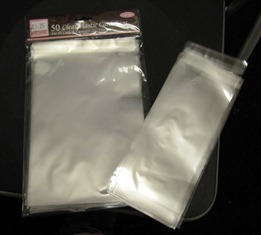
7. The next stage in your card making is to put the envelope inside the card and then place the card with envelope into a cellophane sleeve. Secure the sleeve shut and now you have your finished cards. Using a cellophane sleeve gives a very professional finish. 8. Your last task is to price your cards and find some places to sell them.
|